자!!! 병아리들~~!!!!
챕터 3이 거의 다 끝나간다 조금만 더 힘을 내자.
우리는 다시 한번 지난 프로젝트를 사용할 것이다.
[[Ch3-7] Fragment, 프래그먼트란 무엇인고~? 간단하게 만들어 보기 (Using Fragments in Android)
https://mckal-story.tistory.com/29
챕터 3-7에서 만들었던 기본 프래그먼트가 있는 사람은 그걸 사용/수정 해도 좋고
혹시나 없는 사람은 아래의 소스코드가 그리 복잡하지 않으니, 그걸 그냥 따라해도 좋다.
우리는 늘 그렇듯 어떤 기능을 만들지 목표 부터 확인한다.
목표 기능

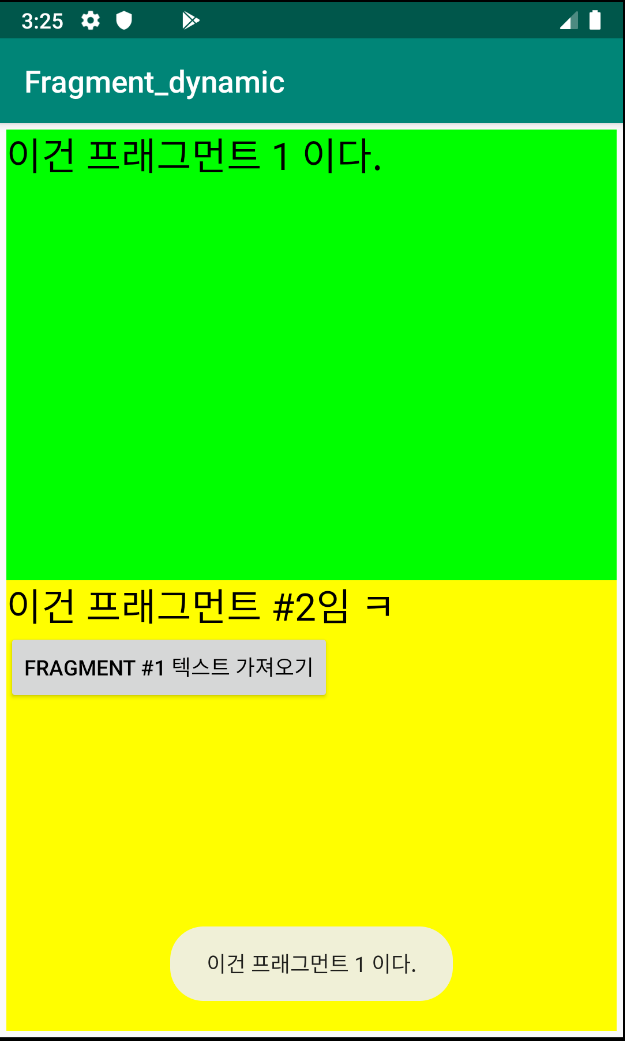
소스코드를 확인해보자.
main.xml (res->layout)
<?xml version="1.0" encoding="utf-8"?>

<LinearLayout
    xmlns:android="http://schemas.android.com/apk/res/android"
    android:orientation="vertical"
    xmlns:tools="http://schemas.android.com/tools"
    android:layout_width="match_parent"
    android:layout_height="match_parent"
    android:paddingBottom="@dimen/activity_vertical_margin"
    android:paddingLeft="@dimen/activity_horizontal_margin"
    android:paddingRight="@dimen/activity_horizontal_margin"
    android:paddingTop="@dimen/activity_vertical_margin"
    tools:context="com.example.fragment_Interaction.MainActivity">

    <fragment
        android:name="com.example.fragment_Interaction.Fragment1"
        android:id="@+id/fragment1"
        android:layout_weight="1"
        android:layout_width="fill_parent"
        android:layout_height="match_parent" />

    <fragment
        android:name="com.example.fragment_Interaction.Fragment2"
        android:id="@+id/fragment2"
        android:layout_weight="1"
        android:layout_width="fill_parent"
        android:layout_height="match_parent"
        />
</LinearLayout>
fragment1.xml (res->layout) ; ※ Empty Project 로 생성하여 이 파일이 없다면, "생성"
<?xml version="1.0" encoding="utf-8"?>
<LinearLayout
    xmlns:android="http://schemas.android.com/apk/res/android"
    android:orientation="vertical"
    android:layout_width="fill_parent"
    android:layout_height="fill_parent"
    android:background="#00FF00"
    >

    <TextView
        android:id="@+id/lblFragment1"
        android:layout_width="fill_parent"
        android:layout_height="wrap_content"
        android:text="이건 프래그먼트 1 이다."
        android:textColor="#000000"
        android:textSize="25sp" />
</LinearLayout>
fragment2.xml (res->layout) ; ※ Empty Project 로 생성하여 이 파일이 없다면, "생성"
<?xml version="1.0" encoding="utf-8"?>
<LinearLayout
    xmlns:android="http://schemas.android.com/apk/res/android"
    android:orientation="vertical"
    android:layout_width="fill_parent"
    android:layout_height="fill_parent"
    android:background="#FFFE00"
    >
<TextView
    android:layout_width="fill_parent"
    android:layout_height="wrap_content"
    android:text="이건 프래그먼트 #2임 ㅋ"
    android:textColor="#000000"
    android:textSize="25sp"/>

<Button
    android:id="@+id/btnGetText"
    android:layout_width="wrap_content"
    android:layout_height="wrap_content"
    android:text="Fragment #1 텍스트 가져오기"
    android:textColor="#000000"
    android:onClick="onClick"
    />
</LinearLayout>
AndroidManifest.xml (manifests)
<?xml version="1.0" encoding="utf-8"?>
<manifest xmlns:android="http://schemas.android.com/apk/res/android"
    package="com.example.fragment_Interaction">

    <application
        android:allowBackup="true"
        android:icon="@mipmap/ic_launcher"
        android:label="@string/app_name"
        android:roundIcon="@mipmap/ic_launcher_round"
        android:supportsRtl="true"
        android:theme="@style/AppTheme">
        <activity android:name=".MainActivity">
            <intent-filter>
                <action android:name="android.intent.action.MAIN" />

                <category android:name="android.intent.category.LAUNCHER" />
            </intent-filter>
        </activity>
    </application>

</manifest>
dimens.xml (res->values) ; ※ 기존에 생성된것이 없다면 생성
<?xml version="1.0" encoding="utf-8"?>
<resources>
    <dimen name="activity_vertical_margin">4dp</dimen>
    <dimen name="activity_horizontal_margin">4dp</dimen>


</resources>
MainActivity.java (app->java)
package com.example.fragment_Interaction;


import android.support.v7.app.AppCompatActivity;
import android.os.Bundle;
import android.os.Bundle;

public class MainActivity extends AppCompatActivity {

    @Override
    protected void onCreate(Bundle savedInstanceState) {
        super.onCreate(savedInstanceState);
        setContentView(R.layout.activity_main);
    }
}
Fragment1.java (app->java) ; ※ Empty Project 로 생성하여 이 파일이 없다면, "생성"
package com.example.fragment_Interaction;

import android.os.Bundle;
import android.support.v4.app.Fragment;
import android.view.LayoutInflater;
import android.view.View;
import android.view.ViewGroup;

public class Fragment1 extends Fragment {
    @Override
    public View onCreateView(LayoutInflater inflater,
                             ViewGroup container, Bundle savedInstanceState) {

        // -- Inflate the layout for this fragment --
        return inflater.inflate(
                R.layout.fragment1, container, false);
    }
}
Fragment2.java (app->java) ; ※ Empty Project 로 생성하여 이 파일이 없다면, "생성"
package com.example.fragment_Interaction;

import android.os.Bundle;
import android.support.v4.app.Fragment;
import android.view.LayoutInflater;
import android.view.View;
import android.view.ViewGroup;
import android.widget.Button;
import android.widget.TextView;
import android.widget.Toast;


public class Fragment2 extends Fragment {
    @Override
    public View onCreateView (LayoutInflater inflater,
                              ViewGroup container, Bundle savedInstanceState) {
        // -- Inflate the layout for this fragment --
        return inflater.inflate(
                R.layout.fragment2, container, false);
    }


    @Override
    public void onStart(){
        super.onStart();

        //-- Button View ---
        Button btnGetText = (Button)
                getActivity().findViewById(R.id.btnGetText);
        btnGetText.setOnClickListener(new View.OnClickListener() {

            public void onClick(View v) {
                TextView lbl = (TextView)
                        getActivity().findViewById(R.id.lblFragment1);
                Toast.makeText(getActivity(), lbl.getText(), Toast.LENGTH_LONG).show();

            }
        });
    }
}
위와같이 코드를 작성하면, 아까 보았던 기능을 구현할 수 있다.
눈치빠른 삐약이들은 알아챘겠지만, 대부분의 구조와 기능은 지난 챕터에서 다 했던것들이고
사실 중요한건 fragment2.xml 과 fragment2.java 소스코드이다.
----------------------------------------
getActivity() 메서드를 이용하여, 현재 프래그먼트가 임베디드(embeded; 속해있다는 것 정도로 해석하면 되겠다)되어있는 액티비티를 찾는다. 그 다음 findViewById() 메서드를 사용하여, 액티비티 내의 (정확히 말하면 "액티비티" 안에 "프래그먼트" 안에있는 "뷰를") 찾아낸다.
그 다음 토스트 메서드를 사용하여 글자를 화면 앞으로 띄워준다.
----------------------------------------
※ 현재는 프래그먼트가 어떻게 서로 상호작용 하는지를 알아보는데에 집중하자. 너무 세세한 것에 목메다가 개발 공부를 포기한 적이 한두번이 아니다.